
Sauces & Condiments
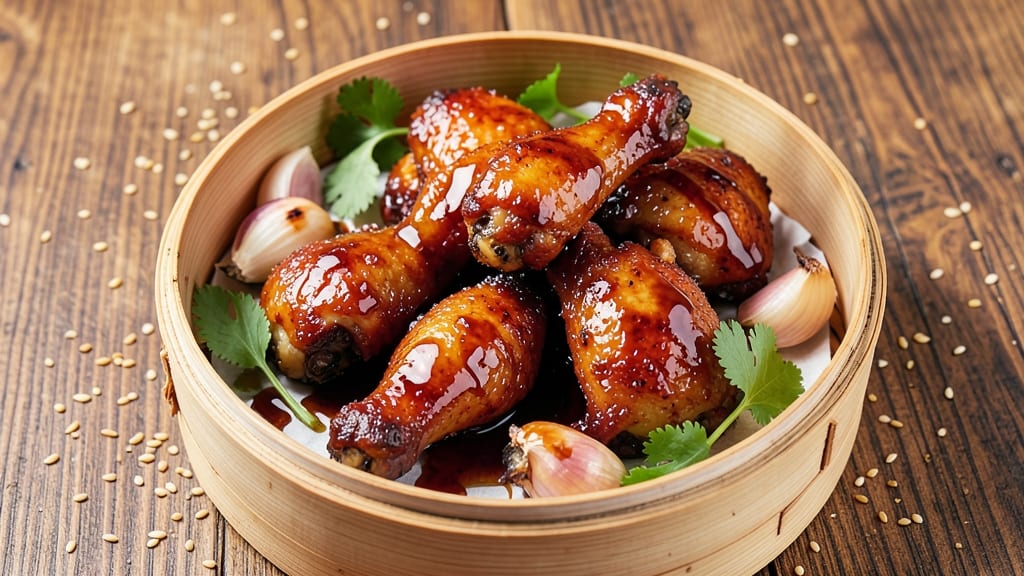
This sweet soy sauce chicken wings recipe delivers the perfect balance of sticky-sweet glaze and juicy, crispy texture that keeps every bite irresistible. The secret lies in marinating the wings overnight, allowing the sauce to penetrate deeply while keeping the meat tender.
What sets this apart is the double-glazing technique—first before baking, then again after—for that signature restaurant-quality sheen.
You'll start with simple ingredients: chicken wings, a blend of soy sauce, brown sugar, and garlic, plus a touch of honey for depth. The marinade transforms tough wings into melt-in-your-mouth bites while the baking process locks in moisture.
The final glaze, brushed on just before serving, creates that glossy, caramelized finish that makes these wings impossible to resist.
What you end up with is a dish that's crispy on the outside, tender on the inside, and coated in a sauce that's perfectly balanced—sweet enough to satisfy cravings but savory enough to keep it sophisticated.
These wings are ideal for game day, dinner parties, or a weekend treat. The recipe scales easily, so you can make a full batch or just a few for a lighter meal.
Serve with classic sides like steamed rice, cucumber salad, or quick-pickled vegetables to round out the meal. The contrast of cool, fresh veggies against the warm, sticky wings makes every bite even better. Ready to master this crowd-pleaser? Let's get started.
Ingredients for sweet soy sauce chicken wings
Simple ingredients transform into restaurant-quality wings with a perfect balance of sweet and savory.
| Ingredient | Amount | Notes |
|---|---|---|
| Chicken Wings 🍗 | 2 ½ lb | Split into drumettes and flats |
| Soy Sauce 🍶 | ½ cup | Low-sodium preferred for balance |
| Brown Sugar 🍚 | ½ cup | Packed firmly for accuracy |
| Honey 🍯 | ¼ cup | Wildflower preferred for depth |
| Garlic Cloves 🧄 | 6 cloves | Minced finely for infusion |
| Sesame Oil 🫒 | 1 tbsp | Toasted sesame oil for aroma |
| Rice Vinegar 🍶 | 1 tbsp | White vinegar substitute |
| Ginger Root 🌿 | 1 tbsp | Freshly grated for zing |
| Cornstarch 🌾 | 2 tbsp | For crispy coating |
| Olive Oil 🫒 | 2 tbsp | Light coating for baking |
| Salt 🧂 | 1 tsp | Kosher salt for seasoning |
| Black Pepper 🌶️ | ½ tsp | Freshly cracked for heat |
| Sesame Seeds 🌾 | 1 tbsp | Toasted for garnish |
The chicken wings are the foundation—bone-in, skin-on for maximum flavor and crispiness. Most grocery stores sell them pre-split into drumettes and flats, but if you're buying whole wings, separate them yourself. Costco or Trader Joe's often have the best prices for bulk packages. Look for wings with a vibrant pink color and minimal bruising. The cornstarch is key for that crispy texture—don't skip it. I always buy it in bulk from the baking aisle at Walmart or Target since it lasts forever.
No sesame oil? Toasted peanut oil works in a pinch, though the flavor will differ slightly. Substitute honey with maple syrup if you're avoiding refined sugar, but reduce by 10% since it's less concentrated. The rice vinegar adds brightness—if you don't have it, a splash of apple cider vinegar does the trick. For the ginger, fresh is ideal, but if you're using powdered, cut the amount in half. The soy sauce should be low-sodium to avoid overpowering the sweetness. If you're using regular soy sauce, reduce the salt in the recipe by half.
Marinate the wings overnight for maximum tenderness, but if you're short on time, 4 hours minimum still works. The sauce keeps well in the fridge for 5 days—just give it a quick stir before using. For extra crispiness, bake the wings on a wire rack set over a baking sheet. Store leftovers in an airtight container for 3 days, but they reheat best in the oven at 375°F for 10-15 minutes. These wings freeze beautifully—coat them in extra sauce before freezing for 2 months.
Why You'll Love This Recipe
- One-Pan Magic: I swear by this recipe because it’s that easy—just toss wings in a bowl with soy sauce, brown sugar, honey, and minced garlic, then bake. No flipping, no fuss, no extra bowls to wash. (Yes, even on a Tuesday night.)
- Sweet-Savory Balance: The brown sugar and honey caramelize into a sticky glaze while the soy sauce keeps it rich and umami—crispy outside, tender inside. Honestly, I’ll take these over any store-bought wings any day.
- Game for Any Gathering: Whether it’s a lazy Sunday brunch, a game-day spread, or a quick weeknight dinner, these wings adapt. Double the batch, reheat them, or serve them cold in wraps—no one will complain.
- Budget-Friendly Crunch: Chicken wings are cheap, and this recipe stretches ingredients without sacrificing flavor. Plus, leftovers reheat perfectly—so you’re feeding a crowd or just yourself, it’s a win. (My daughter picks out the best pieces, but still asks for seconds.)
Step-by-step instructions for sweet soy sauce chicken wings
Here's the method for wings that balance sticky-sweet glaze with crispy texture and tender meat.
Prepare the Glossy Glaze
In a small saucepan, combine the 0.5 cup soy sauce, 0.5 cup brown sugar, 0.25 cup honey, 1 tablespoon rice vinegar, and 1 tablespoon freshly grated ginger root. Bring to a gentle simmer over medium heat, stirring constantly for 5 minutes until the sugar fully dissolves and the mixture thickens slightly. This creates the base for our balanced sweet-savory sauce.
While the glaze simmers, mince the 6 cloves garlic cloves finely using a knife or garlic press. When the glaze reaches 180°F (about 3-4 minutes after simmering begins), remove from heat and stir in the garlic and 1 tablespoon toasted sesame oil. Let it cool for 10 minutes—this resting period allows the flavors to meld before coating the wings. The glaze should be thick enough to coat the back of a spoon but still flow smoothly.
Create the Crispy Cornstarch Coating
In a shallow bowl, whisk together the 2 tablespoons cornstarch, 1 teaspoon kosher salt, and 0.5 teaspoon freshly cracked black pepper. Add the 2.5 pounds chicken wings (split into drumettes and flats) and toss gently to coat evenly. Let them sit for 10 minutes while you preheat your oven to 425°F. This resting time ensures the cornstarch adheres properly for maximum crispiness.
Line two baking sheets with parchment paper and lightly brush each wing with 1 tablespoon olive oil using a pastry brush. Arrange the wings in a single layer, leaving 1 inch between each piece. They should fit comfortably without overcrowding, which prevents even cooking. The oil helps create a golden crust while the cornstarch ensures that signature crispy texture we're after.
Bake for Crispy Texture
Bake the wings for 25 minutes, flipping halfway through at the 12-minute mark. Rotate the baking sheets front to back for even heat distribution. You'll know they're ready when the edges are deep golden brown and the cornstarch coating is crispy—almost like a light breading. Don't walk away during this step; the high heat works quickly, and you want to catch them at peak crispiness.
Remove the wings from the oven and transfer them to a wire rack set over a baking sheet. Immediately brush each wing generously with the cooled glaze, working quickly so the sauce doesn't pool. The contrast between the crispy exterior and the juicy interior is what makes these wings exceptional. Let them rest for 5 minutes before serving—this allows the glaze to set slightly and the juices to redistribute.
Garnish and Serve
While the wings rest, sprinkle them evenly with the 1 tablespoon toasted sesame seeds. These add a nutty crunch and visual appeal that elevates the dish. Serve immediately with extra glaze on the side for dipping. The wings should be sticky-sweet on the outside, with tender meat that pulls apart easily and juices that flow freely when cut. For best results, serve with a side of steamed vegetables or a simple cucumber salad to balance the richness.
This recipe delivers on the promise of juicy wings by combining the magic of cornstarch for crispiness with a well-balanced glaze that doesn't overpower the natural flavor of the chicken. The key is patience—letting the glaze cool before brushing ensures it doesn't burn during the final step, while the resting period guarantees maximum moisture retention.
Pro Tips For Making Sweet Soy Sauce Chicken Wings
- CRANK THE HEAT FIRST: Blister those wings hard for 8-10 minutes straight in a 425°F (220°C) oven—no rushing. I learned this after making sticky, undercooked wings that needed another round in the oven. The initial high heat caramelizes the sugar faster and locks in that deep glaze.
- MINCE THAT GARLIC FINE: Use a knife instead of a press for the garlic—tiny, even pieces toast faster and infuse the sauce better. I used to smash it with the flat of the blade, but now I make a paste with a pinch of salt first. The flavor difference is noticeable in every bite.
- DON’T DROWN THE WINGS: After tossing the wings in sauce, spread them in a single layer on the tray. Crowding steams them instead of browning. I used to pile them high, thinking more sauce = better flavor, but the result was soggy, uneven wings. Space them out for crispy edges.
- GLAZE IN BATCHES: Slather the sauce on in two thin coats—first after the initial bake, then again after a 5-minute rest. The second coat sticks better and caramelizes more evenly. I used to dump all the sauce at once, and it’d pool at the bottom of the tray. Two coats mean consistent sweetness and less waste.
Troubleshooting this recipe
Glaze Too Thin
If your glaze ends up too runny, simply return it to low heat and simmer for an extra 2-3 minutes to reduce. I’ve found that using light cornstarch** (1 tsp mixed with 1 tbsp water) as a thickener works wonders—just stir it in at the end.
The glaze should coat the back of a spoon but still flow smoothly. If you’re in a rush, let it cool slightly before applying to avoid drips. 🔥
Wings Not Crispy
Overcrowding is the #1 culprit for soggy wings. Arrange them in a single layer with at least 1 inch between each piece on your baking sheets. For extra crispiness, bake on a wire rack placed over a baking sheet to allow air circulation.
If your oven runs hot, reduce the temperature to 400°F and bake for 30 minutes instead. Don’t skip the cornstarch coating—it’s non-negotiable for that satisfying crunch. ✨
Glaze Burns Before Wings Cook
Brush the glaze on after baking, not before—this is critical. The high heat of the oven will turn the sauce into a sticky mess if applied too early. If you’re worried about the glaze burning during the final step, keep your oven door closed as much as possible.
For a foolproof method, let the glaze cool completely before brushing it on the wings. 💫
Sauce Too Sweet
Balance is key with this glaze. If the sweetness overpowers, add 1 tsp rice vinegar or ½ tsp soy sauce to cut through it. I’ve also had success adding a pinch of red pepper flakes for a subtle kick.
Taste as you go—adjust gradually to avoid overcorrecting. The sauce should complement the wings, not dominate them.
Wings Dry Out
Don’t skip the resting period after baking—this allows juices to redistribute. If your wings still seem dry, increase the marinating time to 8-12 hours for deeper flavor and moisture.
For extra insurance, brush the wings with a little olive oil before baking. The cornstarch coating helps lock in moisture, but proper marinating is the real game-changer. 💡
Glaze Won’t Stick
Cold glaze won’t adhere well to hot wings. Let the glaze cool to room temperature before brushing it on—this ensures it clings beautifully. If it’s still too runny, simmer it again for 1-2 minutes to thicken slightly.
For extra grip, toss the baked wings in a little cornstarch before glazing. The texture contrast makes all the difference! 🌟
Nutrition facts
Frequently asked questions
Can I use regular soy sauce instead of low-sodium?
Yes, but you'll need to adjust the salt. Regular soy sauce is much saltier, so reduce the 1 teaspoon kosher salt in the cornstarch coating to ½ teaspoon. Taste the glaze before applying—it should enhance the wings, not overpower them. The sweetness in the sauce balances the saltiness beautifully when done right.
How do I make these wings spicier?
Add ½ teaspoon red pepper flakes to the cornstarch coating or 1 teaspoon sriracha to the glaze after it cools. For extra heat, sprinkle ½ teaspoon cayenne pepper over the wings before baking. Start with small amounts—you can always add more, but you can't take it out! The sweet glaze will mellow the spice slightly.
Can I air fry these wings instead of baking?
Air fry at 375°F for 18-20 minutes, shaking the basket every 5 minutes for even cooking. Brush with glaze after air frying. The air fryer gives you crispiness without the oven's dry heat, but watch closely—they cook faster than in the oven.
What's the best way to store leftovers?
Let the wings cool completely, then store in an airtight container for 3-4 days in the fridge. For reheating, bake at 350°F for 10 minutes to restore crispiness. The glaze may thicken slightly when reheated—just warm it in the microwave for 10-15 seconds and stir. Freeze for up to 2 months by coating in extra glaze before freezing.
Why does the glaze turn dark brown when baking?
This is normal! The caramelization happens when the glaze hits the hot wings. For a lighter color, brush it on right after removing from the oven while the wings are still hot. If you prefer a deeper color, let the glaze sit on the wings for 1-2 minutes before serving. The flavor won't be affected—it's just visual.