
Sauces & Condiments
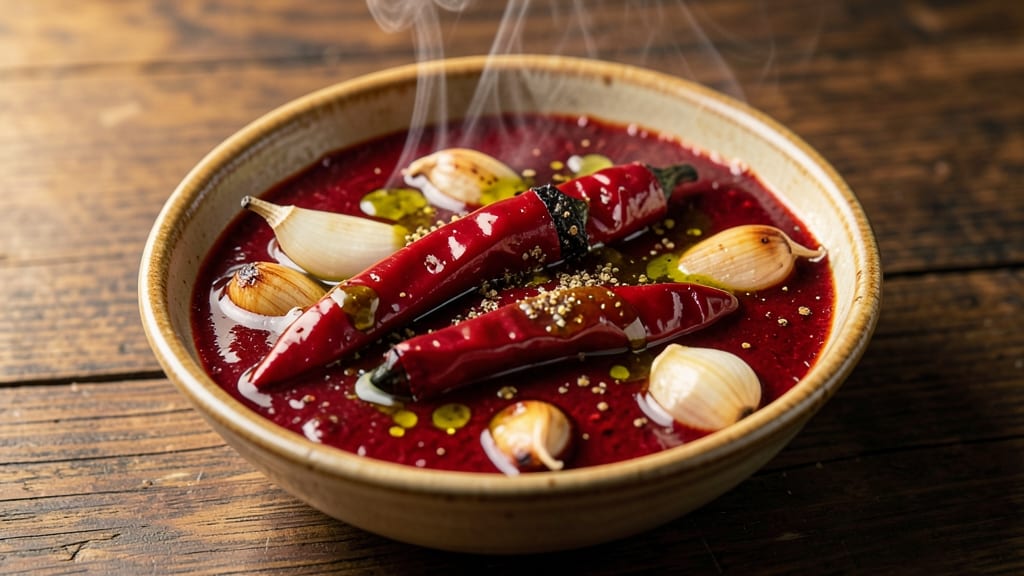
The authentic Portuguese piri piri sauce transforms simple grilled dishes into bold, smoky masterpieces straight from Lisbon’s legendary kitchens. This fiery condiment balances heat, acidity, and garlic’s punch—no shortcuts, just traditional ingredients blended to perfection.
The secret lies in fresh piri piri peppers, toasted until smoky, then blended with garlic, lemon, and olive oil for a sauce that clings to every bite.
What sets this sauce apart is its depth: the peppers’ natural heat mellows into a complex, slightly sweet smokiness when properly prepared. Unlike store-bought versions, this recipe uses whole spices and fresh citrus for brightness that fades over time.
The result? A sauce that’s versatile enough for chicken, seafood, or grilled meats but always delivers that unmistakable Portuguese kick.
With just 10 minutes of active prep and 30 minutes of resting, you’ll have a sauce that’s ready to elevate any dish. The blend of garlic, vinegar, and olive oil creates a silky texture that coats proteins beautifully, while the lemon keeps the heat balanced.
Store it in the fridge for up to 2 weeks, or freeze for longer shelf life—though you’ll likely use it all before then.
Perfect for marinades, dipping, or finishing dishes, this sauce turns ordinary meals into restaurant-worthy experiences. The key is patience: let the flavors meld, and the heat will come alive. Here’s how to make it authentically.
Ingredients for authentic portuguese piri piri sauce
Traditional Portuguese ingredients blend fiery heat with smoky depth for this iconic sauce.
| Ingredient | Amount | Notes |
|---|---|---|
| Fresh Piri Piri Peppers 🌶️ | 12 whole | Stems removed, seeds kept for heat |
| Extra-Virgin Olive Oil 🫒 | ¾ cup | High-quality, fruity variety |
| Garlic Cloves 🧄 | 6 cloves | Fresh, peeled, lightly toasted |
| Fresh Lemon Juice 🍋 | ¼ cup | Strained, seeds removed |
| White Vinegar 💧 | ¼ cup | Distilled, for acidity balance |
| Ground Cumin 🌿 | 1 tsp | Toasted for enhanced aroma |
| Smoked Paprika 🌶️ | 1 tsp | For authentic smokiness |
| Salt 🧂 | 1 tsp | Diamond Crystal kosher preferred |
| Black Peppercorns 🌶️ | ½ tsp | Freshly cracked for intensity |
| Fresh Bay Leaves 🍃 | 2 whole | Lightly crushed for aroma |
The piri piri peppers are the heart of this sauce—fresh, vibrant, and never dried. Authentic versions use the small, red African bird's eye peppers, but fajita peppers or Thai chilies work in a pinch if unavailable. Toast them whole in a dry skillet until fragrant and slightly charred—this step unlocks their smoky complexity. For sourcing, Latin markets or specialty grocers often carry them fresh, while Penzeys Spices sells them dried as a backup. Never skip the seeds; they contain concentrated capsaicin for that signature kick. If handling fresh peppers feels intense, wear gloves—they stain and burn skin.
The garlic deserves special attention: lightly toast the cloves in olive oil before blending to mellow their sharpness and deepen their flavor. No fresh garlic? Garlic powder at half the amount works, but the sauce loses nuance. The vinegar and lemon juice balance the heat—white vinegar is traditional, though apple cider adds subtle sweetness. For extra authenticity, substitute half the vinegar with white wine if you have it. The spices—cumin, smoked paprika, and black pepper—should all be toasted in a dry pan for 30 seconds to release their oils before blending. This transforms them from background notes to flavor anchors. Store-bought piri piri sauces often lack this depth, which is why homemade always wins.
This sauce develops best when rested 30 minutes to 2 hours before use—patience lets the heat mellow and flavors meld. Store in a glass jar with a tight seal, submerged in olive oil to preserve freshness. Keeps in the fridge for 2 weeks, though quality declines after 10 days. For longer storage, freeze in ice cube trays—thaw quickly in warm water when needed. The sauce intensifies over time, so taste and adjust heat with extra lemon juice if needed. Avoid metal utensils when serving, as the capsaicin can react with metals and create bitterness. Always serve with crusty bread on hand for immediate heat relief.
Why You'll Love This Recipe
- Five-Ingredient Magic: I swear by this combo—just peppers, garlic, oil, lemon, and vinegar. No fancy gadgets, no hidden pantry items, just pure, fiery flavor that comes together while you chop one onion.
- Heat You’ll Crave: That first char from the peppers? Smoky, bright, with a kick that lingers. The vinegar cuts through the richness, and the lemon keeps it fresh—like a sun-drenched afternoon in Lisbon, bottled.
- Weeknight to Party: Slather it on grilled shrimp for a weeknight dinner or drizzle it over roasted chicken for a gathering. It’s the one sauce that works as hard as you do, turning simple meals into something special.
- Lasts All Week: Make a big batch—it keeps for ages in the fridge. I’ve used mine to wake up store-bought fish, toss with pasta, or even mix into mayo for sandwiches. One jar, endless possibilities.
Step-by-step instructions for authentic Portuguese piri piri sauce
Master this traditional Portuguese sauce with precise technique and bold flavors.
Prepare the Piri Piri Peppers for Maximum Heat
Begin by removing the stems from all 12 whole fresh piri piri peppers, but leave the seeds intact—they contain the sauce's signature fiery heat. I like to work with gloves when handling these peppers, as their oils can irritate sensitive skin. Cut each pepper in half lengthwise, then place them in a food processor fitted with the metal blade attachment.
Pulse the peppers in short bursts until you achieve a coarse, chunky texture—think of it as a rough purée rather than a smooth paste. This texture preserves the peppers' natural heat and aromatic oils while still allowing them to infuse properly. Avoid over-processing, as this can turn the sauce bitter. The mixture should look like a thick, vibrant green relish with visible pepper pieces.
Toast the Garlic and Spices for Depth of Flavor
In a dry skillet over medium-low heat, add the 6 cloves garlic and the 2 whole fresh bay leaves. Toast them for 2-3 minutes, stirring constantly, until the garlic turns golden brown and releases its fragrant aroma. You'll notice the bay leaves become slightly crisp at the edges—this indicates they're ready. Immediately transfer the toasted garlic and bay leaves to your food processor.
Add the 1 teaspoon ground cumin, 1 teaspoon smoked paprika, 1 teaspoon salt, and 0.5 teaspoon black peppercorns to the processor. Pulse everything together for 10-15 seconds just to combine—you don't want to grind the spices into a powder. The goal is to evenly distribute them throughout the pepper mixture while maintaining their distinct textures. This step builds the sauce's authentic Portuguese character with its signature smoky depth.
Blend with Olive Oil for Emulsification
With the food processor running, slowly drizzle in the 0.75 cup extra-virgin olive oil through the feed tube. This gradual addition prevents the oil from splattering while creating a proper emulsion. Process continuously for 1-2 minutes until the mixture becomes smooth and well-incorporated. You should hear a consistent humming sound indicating everything is properly blended.
The sauce should now have a thick, vibrant green consistency with a smooth texture. If it appears too thick, you can add 1 tablespoon of water at a time until it reaches a pourable but still thick consistency. This step is crucial—too much oil makes the sauce greasy, while too little results in a watery, unstable sauce. The proper balance creates that signature Portuguese piri piri texture that clings beautifully to grilled meats.
Incorporate Acid for Balance and Freshness
Transfer the blended pepper mixture to a clean bowl. Stir in the 0.25 cup fresh lemon juice and 0.25 cup white vinegar using a silicone spatula. Mix thoroughly until completely combined. The acid components brighten the sauce's flavor profile, cutting through the heat while adding a refreshing tang that's essential to authentic Portuguese piri piri.
Taste the sauce at this stage. It should be intensely spicy with a bright acidity that makes your mouth water. If needed, adjust the seasoning with additional salt or black peppercorns. Remember, the sauce will mellow slightly as it rests, so don't be afraid to make it bold now. The proper balance of heat, acidity, and smokiness is what makes this sauce truly authentic—this is the moment where all those flavors come together in harmony.
Rest and Develop the Flavors
Cover the bowl with plastic wrap and let the sauce rest at room temperature for at least 1 hour, though I prefer 2-3 hours for maximum flavor development. This resting period allows the spices to fully infuse and the heat to mellow slightly, creating a more balanced sauce. The colors will deepen during this time, and the flavors will meld together beautifully.
After resting, give the sauce one final stir before using. The texture should be thick enough to cling to grilled meats but still pourable. If you find the sauce has separated, simply whisk vigorously to re-emulsify it. This authentic Portuguese piri piri sauce is now ready to transform your grilled chicken, fish, or even roasted vegetables with its signature fiery, smoky heat. The key to using it properly is to apply it generously just before serving—its bold flavors work best when fresh and vibrant.
Pro Tips For Making Authentic Portuguese Piri Piri Sauce
- Char the Peppers First: Toss whole piri piri peppers in a dry skillet over medium-high heat until their skins blacken in spots—about 2-3 minutes per side. This smoky char deepens the sauce’s complexity way more than raw peppers ever will. (Yes, even if you’re impatient like me, resist the urge to rush this.)
- Use Roasted Garlic: Instead of raw, roast whole garlic cloves in olive oil at 400°F (200°C) for 20-25 minutes until golden and soft. Mash them into the sauce later—they add a sweet, mellow depth that cuts through the vinegar’s sharpness without overpowering the peppers.
- Balance the Vinegar: Start with half the vinegar called for, taste, then add the rest gradually. Portuguese piri piri sauce needs acidity, but too much vinegar flattens the peppers’ heat. (I learned this the hard way after a batch tasted like pickled chili flakes.)
- Blend with Hot Oil: Heat the olive oil until shimmering (not smoking) before blending it with the peppers, garlic, and vinegar. The heat helps emulsify the sauce so it’s silky, not oily. (Your blender will thank you—no more greasy separation.)
Dietary considerations for this dish
Heat Level Control
The piri piri peppers in this sauce deliver serious heat—about 50,000-100,000 Scoville units per pepper. For sensitive palates, reduce the number to 8 peppers while keeping seeds intact for some heat.
If you love spice, add 1 extra teaspoon of cayenne after blending. Always wear gloves when handling fresh peppers—the oils can irritate skin and stain surfaces. 🌶️
Gluten-Free Adaptation
This sauce is naturally gluten-free as written, but always double-check your smoked paprika and spices for cross-contamination. I recommend Bob's Red Mill smoked paprika for certified gluten-free options.
The vinegar and lemon juice are also gluten-free, so no substitutions are needed. For extra safety, toast your spices in a clean, dedicated skillet to avoid flour residue.
Vegetarian & Vegan
The recipe is already vegetarian and vegan since it contains no animal products. The garlic, peppers, and spices provide all the umami depth. For a richer texture, blend in 2 tablespoons of nutritional yeast after the initial mix.
Store-bought piri piri sauces often contain fish-based ingredients, but this homemade version keeps it plant-forward while delivering authentic Portuguese heat. 💚
Allergy Considerations
This sauce contains garlic and citrus, which are common allergens. For garlic-free versions, omit the toasted cloves and add 1 extra teaspoon of onion powder to compensate for flavor. If nut allergies are a concern, avoid cross-contamination by using a separate food processor.
The olive oil and vinegar are typically safe unless you have specific oil allergies—always check labels for refined products.
Low-FODMAP Options
For a low-FODMAP version, reduce garlic to 2 cloves (lightly toasted) and omit the onion powder. Use 1 teaspoon of garlic-infused oil instead of fresh garlic for flavor without the digestive impact.
The piri piri peppers are low-FODMAP in small amounts, but limit to 6 peppers total. The lemon juice and vinegar remain safe, but monitor portion sizes if sensitive to acids.
Storage Adjustments
To preserve freshness for allergy-sensitive households, store the sauce in a glass jar with a tight seal submerged in olive oil. This prevents oxidation and keeps it stable for up to 3 weeks in the fridge.
For freezing, portion into ice cube trays—thaw quickly in warm water to maintain texture. Always relabel containers with ingredients and dates to avoid mix-ups with other spicy sauces. ✨
Nutrition facts
Frequently asked questions
Can I substitute piri piri peppers with other hot peppers?
Yes, but results will differ. For closest heat, use fajita peppers or Thai bird's eye chilies (remove seeds for less heat). For milder versions, try jalapeños or serranos—but toast them longer to develop smokiness. Never use dried peppers; fresh peppers' moisture and oils are essential for authentic texture.
Why does my piri piri sauce separate? How do I fix it?
Separation happens when oil and liquid phases split. Fix it by whisking vigorously or blending briefly with 1 tablespoon of warm water to re-emulsify. For prevention, blend the olive oil in slowly while processing. The sauce should be thick but pourable—like a vibrant green vinaigrette. If it's too thin, simmer uncovered for 5 minutes to reduce excess liquid.
How should I use this sauce on grilled chicken?
For best results, marinate chicken in half the sauce for 2-4 hours before grilling, then brush with remaining sauce in the last 5 minutes of cooking. The heat will caramelize beautifully. For extra flavor, let the chicken rest 10 minutes after grilling before serving. Serve with crusty bread and pickled onions to balance the heat.
Can I make this sauce without a food processor?
Yes! Finely chop 12 piri piri peppers and 6 garlic cloves by hand, then pulse in a mini food processor or mortar and pestle. For the oil emulsion, whisk the blended pepper mixture with olive oil vigorously until thickened. The texture will be slightly chunkier but still delicious. Toasting the garlic and spices in a dry pan remains crucial for depth.
How do I reduce the heat without changing the flavor?
Strain out some pepper seeds before blending, or add 1 extra tablespoon of lemon juice or vinegar to dilute the capsaicin. For a smoother heat, blend in 2 tablespoons of plain yogurt or coconut cream after mixing. Never add sugar—it masks flavor rather than balances heat. The sauce will still taste authentic but with controlled spice.