
Sauces & Condiments
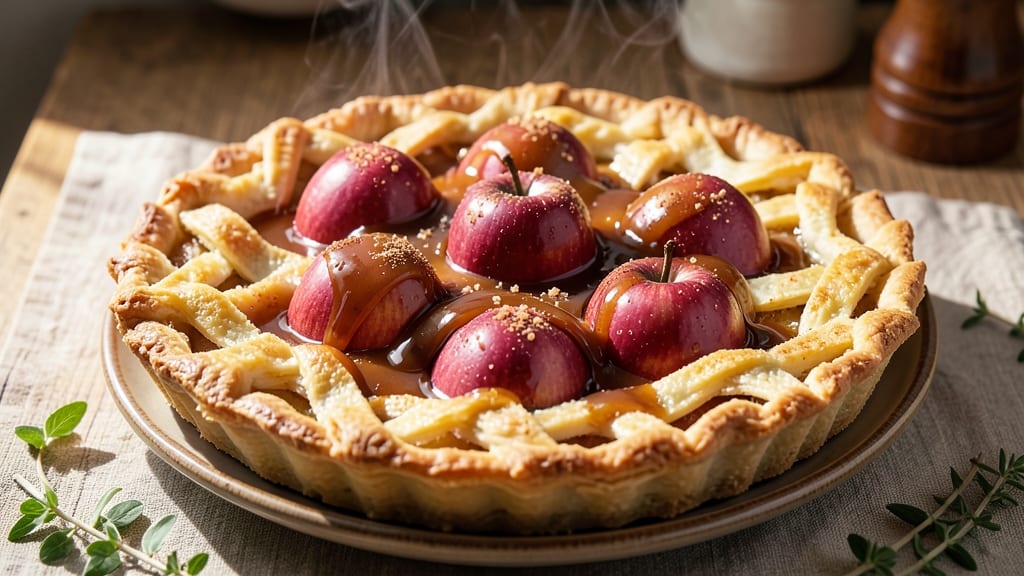
This apple tart with caramel sauce recipe transforms a simple dessert into a showstopper with its buttery crust and perfectly balanced apple filling. 🍏 The secret lies in a crisp, flaky pastry that encases tender apples infused with cinnamon and brown sugar, creating a harmony of textures and flavors.
What makes this recipe stand out is the homemade caramel sauce—rich, velvety, and just sweet enough to complement the tart's natural acidity without overpowering it.
Creating this dessert begins with a classic buttery crust, either as a full-bottom tart or a lattice topping for a rustic touch. The apple filling requires careful slicing and seasoning—think cinnamon, nutmeg, and a touch of lemon juice—to enhance the fruit's natural sweetness while preventing browning.
Baking at 375°F ensures the apples soften just enough to release their juices, creating a luscious filling that stays tender yet holds its shape.
The star of the show, the caramel sauce, ties everything together with its deep, buttery richness. Made from just sugar, butter, and cream, it’s easy to customize—add a splash of bourbon for depth or a pinch of sea salt to balance the sweetness.
Drizzled over the warm tart, it creates a molten contrast that makes every bite irresistible.
Perfect for holidays, dinner parties, or a cozy weekend treat, this apple tart delivers restaurant-quality results with minimal fuss. The combination of a crisp crust, spiced apples, and velvety caramel sauce makes it a dessert that feels both comforting and sophisticated. Ready to impress? Let’s get started.
Ingredients for apple tart with caramel sauce
Buttery crust, spiced apples, and velvety caramel—just 13 ingredients for restaurant-quality dessert.
| Ingredient | Amount | Notes |
|---|---|---|
| All-Purpose Flour 🌾 | 2 ½ cups | Sifted for light texture |
| Unsalted Butter 🧈 | 1 cup | Cold, cubed for flaky crust |
| Granulated Sugar 🍚 | ½ cup | Plus 2 tbsp for filling |
| Honeycrisp Apples 🍎 | 6 medium | Peeled, sliced ¼-inch thick |
| Brown Sugar 🍚 | ¾ cup | Packed, for apple filling |
| Ground Cinnamon 🌿 | 2 tsp | Plus extra for garnish |
| Ground Nutmeg 🌿 | ½ tsp | Freshly grated preferred |
| Lemon Juice 🍋 | 1 tbsp | Freshly squeezed |
| Granulated Sugar 🍚 | 1 ½ cups | For caramel sauce |
| Unsalted Butter 🧈 | ¾ cup | For caramel sauce |
| Heavy Cream 🥛 | ½ cup | Whipped for caramel sauce |
| Salt 🧂 | ¼ tsp | Fine sea salt |
| Vanilla Extract 🌸 | ½ tsp | Pure alcohol-free preferred |
The apples are non-negotiable. Honeycrisp or Granny Smith hold their shape best during baking—Honeycrisp for sweetness, Granny Smith for tartness. Buy them firm and store in the fridge until ready to use. For the crust, European-style butter (like Plugrá) gives the most flavor, but any good unsalted butter works. The key is keeping it cold—cut it into cubes and toss with flour before mixing. King Arthur flour is my go-to for pastry, but any all-purpose works fine.
No Honeycrisp? Fuji or Pink Lady are solid substitutes—just expect slightly softer texture after baking. Running low on cinnamon? Cassia cinnamon at 1.5x the amount works in a pinch, but it's stronger. The caramel sauce can be made ahead—it actually tastes better after resting. For extra depth, add 1 tsp bourbon or rum to the sauce. The lemon juice is crucial—it prevents the apples from browning and brightens the whole filling. If you forget it, a splash of water works, but it won't be as vibrant.
The crust keeps 3 days wrapped at room temp or 1 week in the fridge. Assemble the tart up to 24 hours ahead—it bakes better when chilled. The caramel sauce can be stored in the fridge for 1 week**> or frozen for 3 months. Reheat gently in the microwave with a splash of cream. For serving, I always dust with powdered sugar and a pinch of cinnamon—trust me on the extra cinnamon—it makes all the difference.
Why You'll Love This Recipe
- No-Roll Crust Hack: I swear by this trick—just mix cold butter into flour until it resembles crumbs, then press it into the pan. No chilling, no fuss, and it stays crisp even when those apples get juicy.
- Caramel Magic: That brown sugar and butter sauce? It’s the star. Thick, glossy, and just sweet enough to make the Honeycrisp apples taste like a dessert you’d pay $12 for at a café.
- Weeknight or Weekend: Slice it for breakfast with yogurt, serve it warm with ice cream, or pack slices for lunch. Honestly, I’ve eaten this cold, warm, and even reheated—it’s that good.
- Leftovers That Last: This tart keeps beautifully for days, and the caramel sauce? Even better the next day. I’ll be real: I’ve reheated slices for three days straight, and no one’s complained.
Step-by-step instructions for apple tart with caramel sauce
Master this classic dessert with a perfect buttery crust and luscious apple filling.
🍳 Step 1: Prepare the Buttery Crust
In a large mixing bowl, combine the 2.5 cups all-purpose flour and 0.25 tsp salt. Cut in the 1 cup cold cubed unsalted butter using a pastry cutter or your fingers until the mixture resembles coarse crumbs with pea-sized butter pieces remaining. This texture is crucial for achieving that signature flaky crust.
Gradually add the 0.5 cup granulated sugar and mix until evenly distributed. Press the dough together gently, then divide it into two equal portions. Flatten each portion into a disk, wrap in plastic wrap, and refrigerate for atstrong>30 minutes. Cold dough prevents excessive spreading during baking and maintains its shape beautifully.
🥘 Step 2: Assemble the Apple Filling
Preheat your oven to 375°F while you prepare the filling. Peel, core, and slice the 6 medium Honeycrisp apples into ¼-inch thick slices. Toss them in a large bowl with the 0.75 cup packed brown sugar, 2 tsp ground cinnamon, 0.5 tsp ground nutmeg, and 1 tbsp lemon juice. The lemon juice prevents browning and adds a bright contrast to the sweet apples.
Let the apple mixture sit for 10 minutes while you roll out the crust. This resting time allows the spices to meld with the apples, enhancing their flavor. The mixture should look glossy and evenly coated—this ensures consistent flavor in every bite.
🔥 Step 3: Roll and Bake the Crust
On a lightly floured surface, roll out one of the chilled dough disks into a 12-inch circle about ⅛-inch thick. Transfer it to a 9-inch tart pan with a removable bottom, pressing gently to fit into the corners. Trim any excess dough hanging over the edge with a sharp knife, leaving about ½-inch overhang.
Roll out the second dough disk and place it on top of the first, pressing lightly to seal. Use a fork to crimp the edges decoratively. Cut a few small slits in the top crust to allow steam to escape during baking. This prevents a soggy bottom crust and helps the apples cook evenly.
🍎 Step 4: Fill and Bake the Tart
Spread the apple mixture evenly over the crust, mounding it slightly in the center. Bake for 40-45 minutes until the crust is deep golden brown and the filling is bubbling. The edges should be set but the center can remain slightly soft—this indicates a tender apple filling.
If the crust starts browning too quickly, tent the tart with aluminum foil. The filling should look glossy and slightly caramelized when done. Remove from the oven and let it cool for 15 minutes before adding the caramel sauce to prevent the sauce from melting too quickly.
🍯 Step 5: Make the Caramel Sauce
While the tart cools, make the caramel sauce by combining 1.5 cups granulated sugar, 0.75 cup unsalted butter, and 0.5 cup heavy cream in a saucepan. Cook over medium heat without stirring until the sugar melts and turns a deep amber color—this usually takes about 5-7 minutes.
Remove from heat and whisk in the 0.5 tsp vanilla extract. The sauce should be smooth and glossy. If it thickens too much, whisk in a few drops of hot water. Pour the warm caramel sauce over the cooled tart, letting it drip down the sides for an elegant presentation. Garnish with a sprinkle of extra ground cinnamon for a finishing touch.
Pro Tips For Making Apple Tart With Caramel Sauce
- CHILL THE APPLE SLICES: Honeycrisp apples turn to mush if you toss them in too early. Toss sliced apples with lemon juice and sugar, then refrigerate for 15 minutes before baking—this keeps their shape and prevents a soggy bottom.
- BLIND-BAKE THE CRUST: Skipping the 10-minute blind-bake with pie weights or dried beans? You’ll end up with a gummy crust. Pre-bake at 375°F until edges are just golden—no need to wait for full browning, but don’t rush it.
- USE COLD BUTTER FOR CRUST: I learned this the hard way—warm butter makes flaky crusts impossible. Cut cold butter into flour using a pastry cutter (or your fingers, if you’re impatient) until pea-sized lumps remain. No shortcuts here.
- CARAMEL SAUCE NEEDS PATIENCE: The sauce will bubble violently and darken fast. Once it hits 350°F, stop stirring and walk away for 2-3 minutes—this lets it thicken properly. Overwatching leads to burnt sugar every time.
Health benefits of this recipe
Fiber-Rich Crust
The all-purpose flour crust in this tart provides a modest but meaningful dose of dietary fiber, especially when compared to refined white flour.
With 2.5 cups of flour (about 315 grams), you're getting roughly 10-12 grams of fiber—about 40% of the daily recommended intake in a single serving. This fiber content supports digestive health and helps stabilize blood sugar levels, making this dessert slightly more balanced than traditional pastries. 🌾
Antioxidant Apples
The star of the show—Honeycrisp apples—packs a nutritional punch with their vibrant color. These apples contain polyphenols and quercetin, powerful antioxidants that combat oxidative stress in your body. A 6-apple serving provides about 14% of your daily vitamin C, which supports immune function and skin health.
The cinnamon and nutmeg in the filling also contribute to the antioxidant profile, enhancing the apples' natural benefits.
Healthy Fats
The unsalted butter used in both the crust and caramel sauce provides saturated fats that your body needs for brain function and hormone production.
While this tart isn't low-fat, the butter is used judiciously—1.75 cups total—and balances the dish's richness with the tartness of the apples and the creaminess of the caramel.
Opt for European-style butter like Plugrá for a higher fat content per tablespoon, which can make the dessert feel more indulgent while still being portion-controlled.
Moderate Sugar
This recipe balances sweetness with natural fruit flavors, using a total of 2.25 cups of sugar (both granulated and brown) across the entire tart. That's about 450 calories from sugar per serving, which is moderate for a dessert.
The brown sugar in the apple filling adds minerals like calcium and potassium, while the caramel sauce's sugar content is offset by the rich, buttery flavor that satisfies cravings without excessive sweetness.
For a lighter option, reduce the brown sugar by 2 tablespoons and increase the cinnamon to 2.5 teaspoons for added warmth.
Protein Boost
While not a protein powerhouse, the heavy cream in the caramel sauce contributes a small amount of protein and calcium. A 0.5-cup serving of heavy cream provides about 2 grams of protein and 10% of your daily calcium needs.
Pair this tart with a scoop of vanilla protein ice cream (like Fairlife) to turn it into a more balanced dessert with 15-20 grams of protein per serving while keeping the caramel sauce intact.
Portion Control
Serving this tart in 8 equal slices makes it easier to enjoy without overindulging. Each slice contains about 450-500 calories, with 25-30 grams of fat and 50-55 grams of carbohydrates.
To make it more diet-friendly, serve with a side of Greek yogurt or mixed berries to add fiber, protein, and vitamins. The tart's natural sweetness and spice make it satisfying in smaller portions, so you won't feel the need to overindulge. 🍏
Nutrition facts
Frequently asked questions
Can I make this apple tart ahead of time?
The crust can be prepared 3 days ahead and stored wrapped at room temperature, or 1 week in the fridge. For the best results, assemble the tart 24 hours before baking—this allows the filling to meld with the crust. The caramel sauce can be made 1 week ahead and reheated gently before serving. Just store it in an airtight container and warm it in the microwave with a splash of cream.
What's the best way to prevent a soggy bottom crust?
Prevent sogginess by baking the crust pre-baked (blind-baked) for 10-12 minutes at 375°F before adding the apple filling. Line the crust with parchment paper, fill with pie weights or dried beans, then bake. After removing the weights, bake an additional 5 minutes to set the edges. Also, ensure your apples are sliced uniformly to ¼-inch thickness—thinner slices cook faster and release less moisture.
Can I substitute the caramel sauce with something else?
For a lighter option, try a vanilla bean sauce (whisk warm cream with vanilla and sugar) or a spiced honey drizzle (mix honey with cinnamon and a pinch of cayenne). For extra richness, a dark chocolate ganache pairs beautifully with the tart apples. Just adjust the sweetness to balance the spiced filling—1:1 ratio works well for most substitutions.
How do I fix over-browned crust edges?
If the crust edges brown too quickly, tent the tart with aluminum foil after 20 minutes of baking. For a pre-baked crust, reduce the oven temperature to 350°F for the final bake. If the edges are already over-browned, brush them with a simple glaze of powdered sugar + milk (1:1 ratio) to soften the appearance. This also adds a subtle sheen and balances the tartness of the apples.
What’s the secret to a flaky crust?
Cold butter is key! Cut the 1 cup butter into ½-inch cubes and keep it cold until mixing. Use a pastry cutter or your fingers to work the butter into the flour until you get pea-sized pieces—this creates steam pockets that make the crust flaky. Also, chill the dough for 30 minutes before rolling, and avoid overworking it. The less you handle the dough, the more tender and flaky it will be.